Combat Mechanics & TTK
Ultra-lethal, high-speed paradigm. Combat is rapid decisive actions, not drawn-out trades.
- Basic Grunt — Melee (TPP): 1 hit clean decap/slice · Ranged (FPP): 1 head / 2 torso.
- Elite / Brawler — Melee: 2–3 balanced inputs · Ranged: shield/armor breakdown first.
Melee Drive (TPP)
- Melee Strike performs a directional lunge/slash based on Left Stick facing and camera.
- Range and connect are skill/spacing expressions — player closes distance; no auto target pull.
- Cadence: a kill can chain into the next strike if the player keeps positioning and timing; momentum is player-driven (dash/slide (Vault WILL NOT USE)), not auto-leap radius doubling.
Precision Fire Engine (FPP)
- Manual aiming rewards: headshots neutralize immediately when TTK rules allow.
- Gunfeel layer: Range, Accuracy/Bloom, Aim Assist (Rotation, Strafing, Bullet Magnetism, Stickiness), Recoil, Stability, Barrel Jump/Sway — full programming in Aim Assist section (vol. 02 / 05). One shared baseline for all modes; affixes may modify on top.
- Perspective Shift-Out: during a TPP melee strike, holding LT pulls the camera through the back of the head into FPP before the melee animation ends — 0.2 s bullet-time window for a distant headshot.
Kinetic Flow Meter (Combo Progression)
Section titled “Kinetic Flow Meter (Combo Progression)”One Flow · two verbs (lock)
Section titled “One Flow · two verbs (lock)”| Verb | Stance / cam | Fantasy | Flow credit |
|---|---|---|---|
| Melee Drive | Melee active → always TPP | Directional lunge/slash; dash/slide (Vault WILL NOT USE) cadence; no auto target pull | +1 per kill |
| Precision Fire | Gun + aim → FPP | Manual aim · gunfeel · headshots when TTK allows | +1 per kill |
Mix mid-fight via stance / Square–X melee-from-gun (hybrid camera). Singularity sequence always TPP — no player button. Ultimate stays a separate meter on the Shiv.
Demo Ladder requires this spine: Kinetic Flow → Overclocked → Singularity with Asymmetric Flow, a second combat meter (≠ Ultimate), and full Burst Storm art. Melee Drive + Precision Fire both feed Flow.
Melee Drive · Guns · Counter
Section titled “Melee Drive · Guns · Counter”| Verb | Cam | System | Flow |
|---|---|---|---|
| Melee Drive | TPP | Cone on Attack press + grounded Motion Warp · ANS hit · optional Counter window | +1 on kill / successful Counter |
| Precision Fire | FPP | Firehand / manual aim — no Melee Drive warp while ADS | +1 on kill (same Kinetic Flow) |
| Mix | Hybrid | Melee from gun → TPP strike · ADS suppresses Counter (default) | One Flow ring · Singularity at Tier 3 |
Counter: AI opens a window → OmniVisor / world prompt → Counter warps to ActiveAttackingEnemy (not a blind 360° re-scan). Fail dumps Flow like a whiff. Singularity: auto at Flow Tier 3 — always TPP Special Takedown / Burst Storm; no player button. Ultimate stays a separate Shiv meter (FS-CMB-006).
Demo Ladder (in): Asymmetric Flow · second combat meter = Kinetic Flow (≠ Ultimate / Skill Energy) · full Burst Storm art · Melee Drive (no auto-pull) · stance mix · gun + melee feed Flow. Out: Final Ult 4×4 trees · campaign-only Flow variants · merging Ultimate into Flow · dump Flow on missed gunshots · warp while ADS.
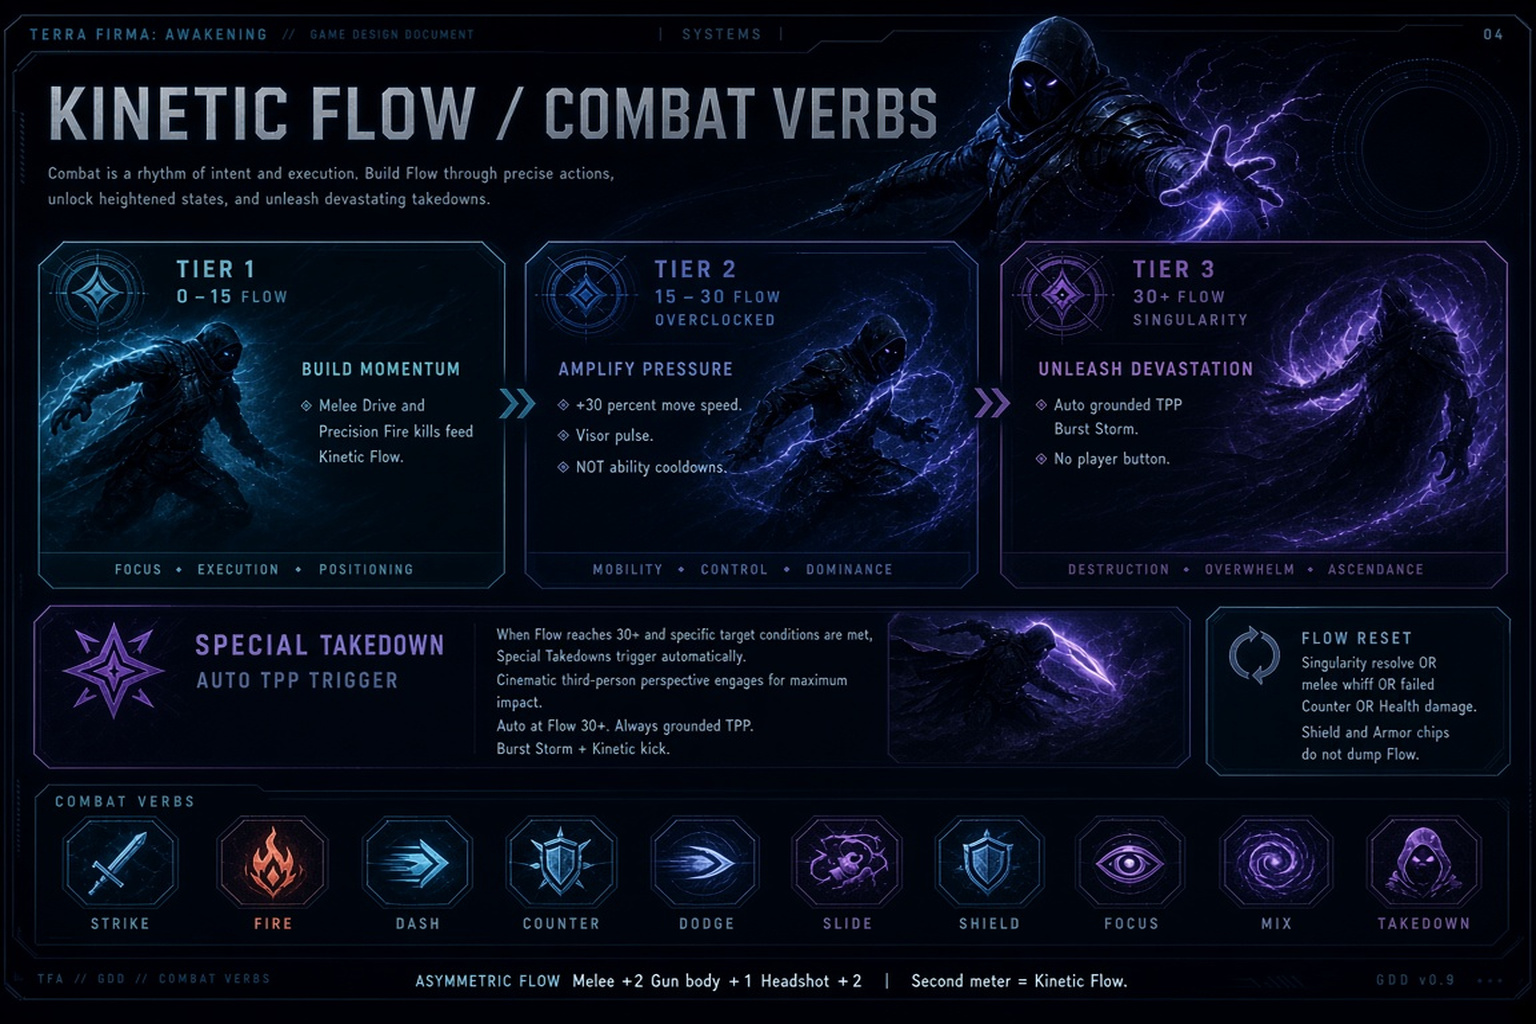
Kill thresholds are triple the original draft so Singularity is a deliberate payoff, not a short-chain freebie.
- Tier 1 (0–15 combo): baseline velocity.
- Tier 2 (15–30 combo) Overclocked: +30% move speed.
- Tier 3 (30+ combo) Singularity: 0.5 s auto bullet-time on the trigger kill; Special Takedown fires automatically — Singularity Burst Storm (10 random grounded radial energy releases + Kinetic outward kick; no button press).
- Special Takedown camera: always pulls to Third-Person (TPP) for the sequence.
- Tier 3 ends with the takedown: when Special Takedown resolves, Flow resets to Tier 1 (combo 0). Player must rebuild kills to climb again.
- Failure: miss execution window, strike empty air, or take any damage → Flow resets to 0 / Tier 1 and 0.5 s stagger.
Singularity is a climax, not a sustained state. One auto takedown → back to Tier 1.
- Anti-Ultimate boundary: grounded 360° flourishes are the Singularity signature; jump / hang-time / multi-second cinematic roots stay reserved for Ultimates and authored combo skills. Exact burst count per takedown and RNG weights are tuning data.
- Read: chaos spin → prism whip → shove. Chip damage then unified launch.
- Character: Glitch strobe-spin — micro-turns + channel color flickers — then one clean 360° prism flourish ending in a palm V-thrust bang.
- VFX: Rapid color-band strobes in a low cylinder (channel roulette), ends with a white kinetic bang.
10 — Prism Storm (Multi-channel + Kinetic)
- Read: pull in → spin the void out. Hardest slingshot outward.
- Character: Inhale curl (suck), then a violent 360° reject-spin — body whirls as if throwing vacuum off the skin, arms wide on the exit frame. Strongest outward fling pose.
- VFX: Brief inward suck, then a violent outward vacuum cough.
9 — Null Tooth (Void + Kinetic)
- Read: cut a plasma orbit around yourself. Shear + skate backward.
- Character: Full 360° disk dance — hips lead, lead arm sweeps a waist-high plasma ring for a complete circle; trailing arm counters. Finish in a planted surf brace.
- VFX: Flat plasma disk spins once at waist/knee height, then dies.
8 — Corona Bite (Plasma + Kinetic)
- Read: spin-compress → detonate. Micro-nuke flyout.
- Character: Elbows in, fists at sternum (contain). Compact 360° whip winds the charge, then the spin breaks into an instant chest-bang open — still no jump.
- VFX: Tiny bright pin at center pops (no mushroom cloud); air hardens.
7 — Atom Snap (Fission + Kinetic)
- Read: sweep the field, then kick it away. Rad tick + shove.
- Character: Clinical 360° scanner turn — one palm down, body rotates clean like a turret. Last eighth of the turn becomes a hard kinetic chop-reject.
- VFX: Pale rad-ring expands along the ground like a scanner sweep, then collapses.
6 — Decay Ring (Isotopic + Kinetic)
- Read: spin the poison out of the core. Toxin + cough-blast knockback.
- Character: Hunched contain, then a dirty 360° rupture-spin — torso corkscrew, arms shove toxin mist into a swirling dome. Head whips with the spin; slight cough hitch.
- VFX: Toxic bladder at feet ruptures into a low expanding dome.
5 — Sporeshock (Toxin + Kinetic)
- Read: become the spark crown for one turn. Zap + cartwheel out.
- Character: Fingers splay; arms draw a live 360° lightning hoop around the torso (spin with the hoop). Snap-stop; residual arcs on the gauntlets.
- VFX: Horizontal lightning crown snaps once at chest/hip height.
4 — Volt Halo (Arc + Kinetic)
- Read: freeze → spin-crack → blast. Ice pop + blast-away.
- Character: Body locks icy-stiff, then a sharp 360° shatter-spin — elbows out, ice plates break off mid-turn. Stops abrupt; breath cloud.
- VFX: Ice crystallizes underfoot, then explodes outward in shards.
3 — Rimeburst (Cryo + Kinetic)
- Read: whirl and throw the heat sheet. Burn + skid outward.
- Character: Chest fills with heat; a full-body 360° sheds a ribbon of fire/ash at waist height (burning-cloak shed). Ends braced, one palm trailing heat.
- VFX: Heat shimmer along the floor; ash strips peel outward.
2 — Cinder Sheave (Thermal + Kinetic)
- Read: spin the quake into the floor. Near foes ragdoll outward.
- Character: Hard knee dip, then a tight 360° pivot on the lead foot while arms carve a horizontal shock ring. Finish planted, fists open at the hips.
- VFX: Ground buckles in a ring; dust/shock lines race out.
1 — Pressure Quake (Kinetic)
- Channel mix uses combat damage channels: Kinetic, Thermal, Cryo, Arc, Toxin, Isotopic, Fission, Plasma, Void (Prism Storm can flicker multiple).
- Knockback tiers (baseline): 0–2 m heavy fly/tumble outward · 2–5 m strong stagger + slide out · 5–8 m hit react / light push.
- Each burst is short (≈0.2–0.45 s) so varieties can chain inside the takedown window.
- Character stays grounded — 360° flourishes and pivots are allowed; no jump, hang-time, or aerial slam (reserved for Ultimates / combo skills).
- Kinetic is always present: release of energy shoves or flies enemies outward (stronger nearer the core).
- Radial attack centered on the operative (TPP Special Takedown camera).
- Automatic / random / no player control — the storm sequences itself.
Shared Rules (All 10)
- When Special Takedown fires at Singularity (30 combo), the climax is a short automatic radial storm of energy releases. Bursts fire quickly, randomly, and without player aim or button input. Every burst includes Kinetic outward kickback — close enemies are thrown away from the operative as energy releases. Channels can appear in any order; repeats are allowed across the storm.
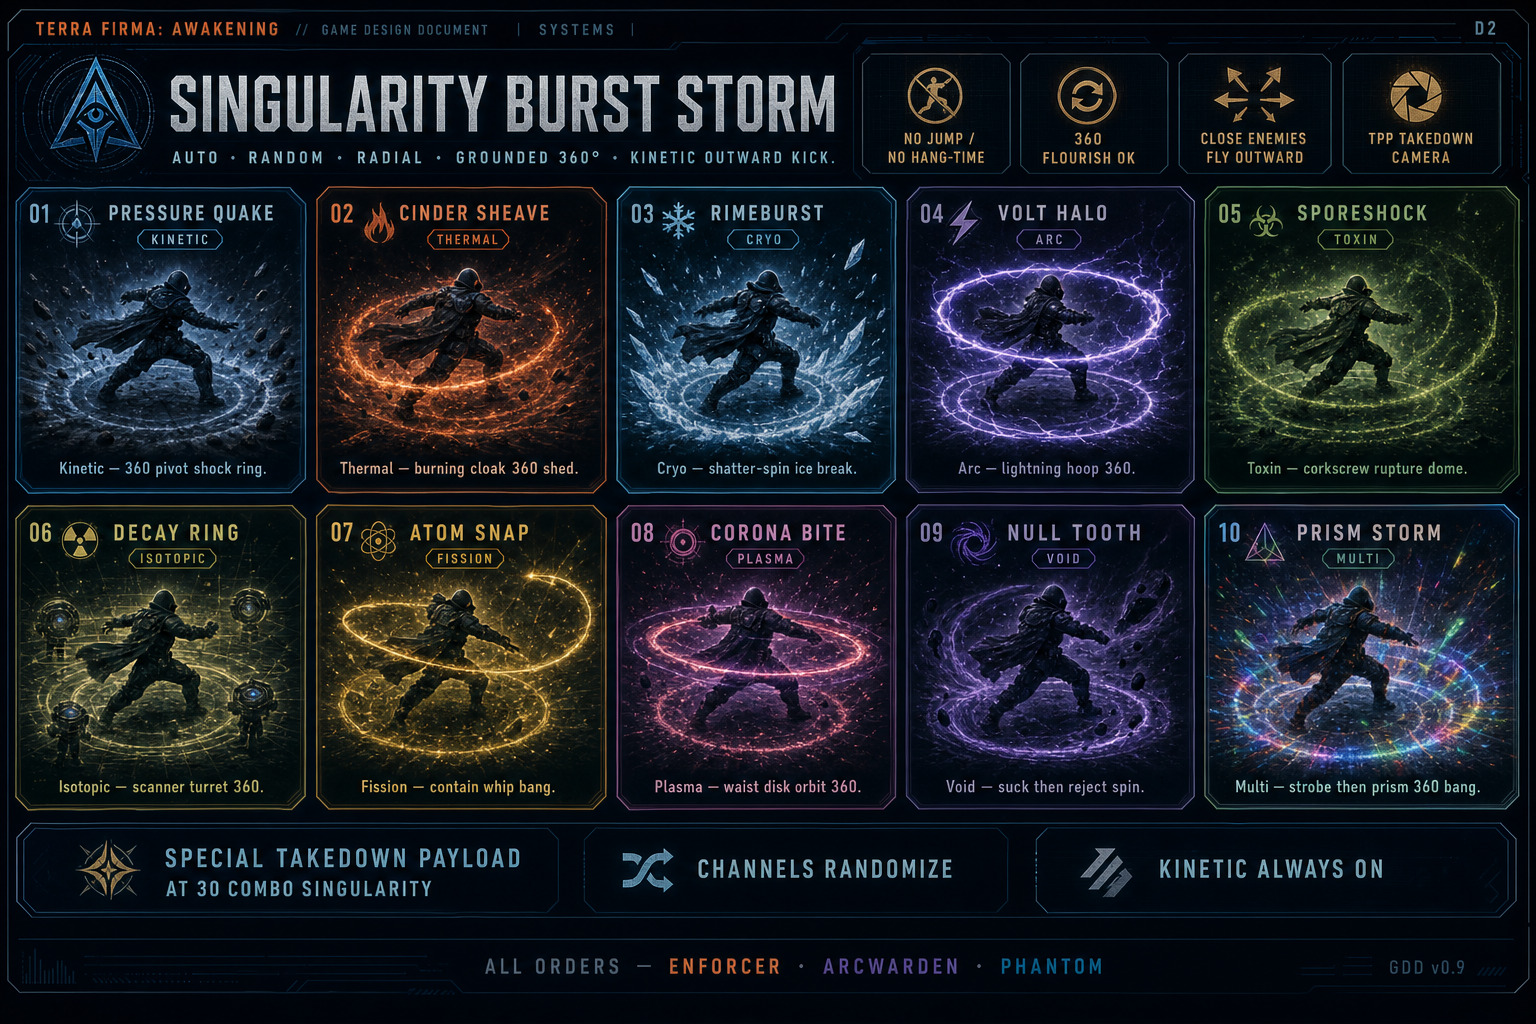
Singularity Burst Storm (Special Takedown Payload)
Experimental Scenario (Early Chain — Still Tier 1)
Section titled “Experimental Scenario (Early Chain — Still Tier 1)”- 1 FPP breach — two hostiles ahead.
- 2 RT headshot Grunt 1 — Combo 1 (Tier 1).
- 3 Move toward Grunt 2 and tap Square — TPP lunge/slice — Combo 2.
- 4 Hold LT during blade follow-through — FPP + dilation; sniper visible.
- 5 RT neutralize sniper — Combo 3.
- 6 Square + Vault over cover into Shielded Enforcer → spine execution — Combo 4. Arena clear.
- (Optional: double-tap Left/Right Dodge to slip gunfire before the vault.)
- Singularity example: continue the chain to 30 combo → auto Special Takedown pulls to TPP → Flow resets to Tier 1 (0). Climb again for the next payoff.
TBD-056 — Flow toughness (no Block). Locked 2026-11-05: Health damage dumps Flow to Tier 1 + 0.5 s stagger. Shield/Armor chips that do not reduce Health do not dump. FS-CMB-004 · singularity Spec.